Showing posts with label diy. Show all posts

Thursday, January 19, 2017

Bullet Journal Binder: my version of a "bullet journal" style planner


At the beginning of last year I noticed bullet journaling becoming popular. It seemed to be a trending topic both in social media + local events. Here there was a group of ladies getting together to update and decorate their planners (planner parties!). I love planners but to me this sounded more like scrapbooking than planning so I opted out. I am not a scrapbooker because I just can't keep up with it. I like crafting but this just wasn't an area of interest for me. I didn't look into it any further and moved right along with my usual way of making lists upon lists everywhere.

Around that same time I had implemented a new large calendar in our kitchen that Ben made me. I absolutely love it and will probably use it for as long as there are children with busy schedules under our roof. I have all these events on my phone but needed something that the whole family could easily access. The large squares make for plenty of room for writing down multiple things each day. It lives on the fridge because we spend most of our time in or near our kitchen, and I even color coded it (with these pens)for at-a-glance interpretation. I do a mass update around the end or beginning of every month and make smaller changes as events are added or cancelled throughout the month. It has really helped me this past year to see how our schedule looks all lumped together, meal plan based on activities each evening and simplify our schedule (AKA say "no thanks) when things got too busy. 


Aside from the calendar our fridge also had a list of monthly to-do lists that were categorized by type, a laminated chore schedule for us and one for the kids. Then on our desk was a clipboard full of various notes and lists, some of which I filed away when I was done with them and others that got recycled if they were no longer needed. I had a seperate notebook for keeping track of essential oil orders + uses, a large spiral notebook with blog notes, a small notebook with our weekly meal plans (we keep our grocery lists on an app called Our Groceries because it syncs between our phones), and if there are any special events or things that need planning they either add to the lists on the clipboard or get their own file (like when it's time to do taxes) that sits in a pile with the clipboard. My lists were everywhere. To-do lists for cleaning, home repairs, event planning, shopping for specific items (notes on prices, brands, and other comparisons), decluttering (oh the irony), gifting during Christmas...

Then during this past winter break I came across something on pinterest that perked my curiosity about bullet journals again. I would give credit but I got swallowed by Pinterest's hoards of information on the subject and can't recall where I had begun but it's likely on my new Organize 2017 board somewhere... The thing that caught my eye was the idea of having all of my events, lists and the like in one area. The dealbreaker for me was that I would have to predict how much space I would need in a bullet journal for a certain section and risk having to continue that section elsewhere in the notebook. I prefer having "like with like" so that wasn't going to work for me. I searched "bullet journal binder" and found hardly anything so I realized I was going to have to figure something out on my own. I realized that while I could format much of this binder like a bullet journal and find ideas using that term, that I could really customize it to my needs and wants. A sort of bullet journal/planner hybrid.

{my cover + Index, as well as my favored pens}


To create my bullet journal binder, I shopped the house. I had quite a few office supplies in good shape from my college days. That was the best part to me because I am out little to no money if I eventually decide this doesn't work for me. Same goes for a traditional bullet journal, there are very inexpensive options out there to start with! I can't say the same for most planners, they tend to be very spendy + expire after the calendar year. 

I posted a few snapshots of my process on Instagram + Facebook and had quite a few questions roll in so I figured posting more extensively about it here would make sense for those interested. 

My first piece of advice is: make it work for you. Don't be afraid to customice pre-existing options and think outside of what current trends are. What first kept me away from bullet journaling was all the pretty curated versions everyone shares. This can be as pretty, plain, or messy as you want it to be- it's for you and no one else! 

I should mention that my version is not meant to shove in a purse and use on the go. I will use all these notes at home. Anything I need to be mobile, is on my phone in the Evernote app, my calendar, or to-do lists. We utilize the family function on iPhone to coordinate tasks + events between myself + Ben.  

After spending a lot of time looking at what I wanted in my binder,  I gathered my supplies: 

Gather your Supplies + make  a wish list: 
First I took notes on what I wanted to have in the binder and how I wanted it to work for me. What features I needed it to have. 
Then I went over all my current methods that I wanted to consolidate and made a list. I used this list to create categories that would go together well for me and turned it into my Index. This would help me create the sections of my journal. 

{upper left: a binder pocket with a label a section label,
 upper right: the legend for symbols used throughout,
ower left: dividers with erasable tabs + washi tape tabs}


Next, I browsed bulletjournal.com to learn more about their concept and format. I used some of their formatting style and left other pieces out. I implemented the Index (but did not number my pages), future log, weekly calendar (which I may not keep up), a daily section and collections. I left out the monthly section since I have those details on my oversized kitchen calendar.


My favorite part is "collections" because it can be whatever you need it to be. You can keep running notes or a "brain dump" section, you can add a section for books you want to read/listen to, you can have to-do lists specific to projects, events or other categories. It's really fluid. If you need aditional inspiration there are ideas all over Pinterest (of course) for different lists to incorporate for both organizational and creative uses. Some are even free printables which make starting up these sections even easier!

Create your Main Sections:
Once I had the big picture down I created the sections based on my index. I worked first on the future log, weekly pages, and daily to-do. I moved anything from my calendar that I wanted to have access to from the notebook to this area. I like the future log for seeing a 6 month period at a glance, I just keep highlights for each month there, I don't include our weekly outings like play dates + Bible study since those are recurring. I also only put immediate family birthdays since I have an extensive list of birthday reminders on my phone. 

{upper left: my future log per the bullet journaling format,
upper right: my daily section on grid paper,
lower photos: my oversized monthly calendar}


The weekly section is still a work in progress for me as I figure how much or how little to include there and whether this section is necessary for me. I like the idea of putting more details on this page than I want to/can fit on my calendar, so it may stay for that purpose. Like notes about what to bring to certain events for example. The daily page is great for tasks, it helps me to remember all the things I wanted to accomplish that day and if something isn't urgent I can add it to the next day or move things I've not finished. 

While I was in the middle of setting up this whole binder I realized I had a ton of things piling up in my brain so I did a quick "brain dump" list so that I could clear my head and move on. I think I will find myself doing this fairly often, It was such a relief to get those things out of my head so I could listen to an audiobook and finish putting this thing together without those distractions. Later in the week I moved things off of that page into the sections where they belong. 

{a printable year at a glance + more 3-ring binder pockets with labels} 

Collections: 
On my Index page you can see the sections I created under collections and some of their subsections. So far my main collections are home, family, health, hobbies and notes. In home I will keep lists of home decor projects, repairs, yard + garden ideas, and the like. Under family I will keep our meal plans, notes about schedules and extracurriculars, birthday planning, etc. 
{upper: our master grocery list for easy restocking reference, l
ower left: weekly meal planning with sticky notes!,
lower right: a list of our favorite meals to aid in creating the sticky note meal planner
and adding variety to our dinner plans}


I made health it's own category instead of putting it under family because I wanted it to have several sub categories. The first page is a lot of notes about each of us and our various ailments because we have all been rotating sickness the last couple of months. This has come in handy already for relaying symptoms and length of time to the doctor at our appointments. I won't keep long term information like allergies and medications here but in our file cabinet with other health records.  I also keep a list of everyone's medication allergies in evernote because our allergies + sensitivities are just simliar enough to each other to get confusing when the time comes to remind the doctor or pharmacist. In the health section I also have a page of essential oil uses and recipes. I had been keeping sticky notes in my oils notebook where  I had kept track of my orders and inventory. Now I can keep those seperate (I have a doTerra section for ordering in the back of my binder). 

My next section is for hobbies. I have quite a few hobbies that I juggle, then leave sitting for a time but always come back to. When I do that I am sometimes left wondering what step I was on in a crochet piece or who was I going to make something for and what colors did they want...so now I have a place to keep all those notes straight. I also have a section there for this blog to keep things straight when I think of an idea for a post or when someone wants to do a feature + review (I have 2 new ones coming up!). 

{left: my first "brain dump" list after having moved these items to their appropriate sections,
upper right: remedies page in our health section,
lower right: crochet projects in the hobby section.}


Misc...
And at the very end of my binder is a section all for varied notes + to-do lists. I would like to create subsection for books I want to read/listen to, I have notes going for a book on the enneagram types I am listening to right now (so fascinating!) and I'm sure I'll keep adding notes to this section. 


My binder is fairly narrow so I see myself pulling things out once I stop needing to add or refer to them any longer and filing them away. In our desk we have two file drawers that we keep things in for less frequent access and storage. Then from there we move things on to recycling, or storage in the garage file cabinets, and lastly if they are a keepsake (like kid's art work, but of course not all of it!) they get boxed for long term storage. I keep a large padded envelope for each child each year so they can be stored away in those for future access, rather than take up precious filing space. 

How do you organize your schedule? Do you bullet journal, use a life planner, or keep track of things in some other way? I am just so thankful there are as many ways to organize things as there are people with different preferences! Only time will tell if this method sticks for me, but I am enjoying trying something new for the moment. 

SaveSave

Thursday, May 1, 2014

Cold Brew Thai Tea or Coffee {and simple syrup} Recipe

I've said it once and I'll say it again, I love Thai iced tea! We hardly ever eat out, but when we have the treat of going out for Thai food I always get one. It goes perfectly with spicy food because of how sweet + creamy it is. I've always wanted to recreate this treat on my own but never found a tutorial easy enough for what I wanted. I didn't want to have to buy all the individual spices and prepare them, I wanted something in tea bag form or as close to it as possible.

A couple weeks ago I was browsing blogs in my feedly when I came across a recipe for blended Thai iced tea. The recommended a loose leaf Thai tea that I could order from Amazon, I had to have it! Ben ordered it for me and when it came I brewed it per the instructions as best I could. I brewed it hot at first and strained it through a coffee filter, then I tried making my own tea bags which worked great but was too time consuming for the amount of tea I wanted. Next I tried cold brew, which is how I make iced coffee at home. There are plenty of methods for cold brewing from what containers you use to how you filter it. I tend to use what I have on hand whenever possible, which is how I came up
with this method a couple years ago.


Cold Brewed Thai Tea, or Coffee 
(this will make a small batch, 2-3 servings)

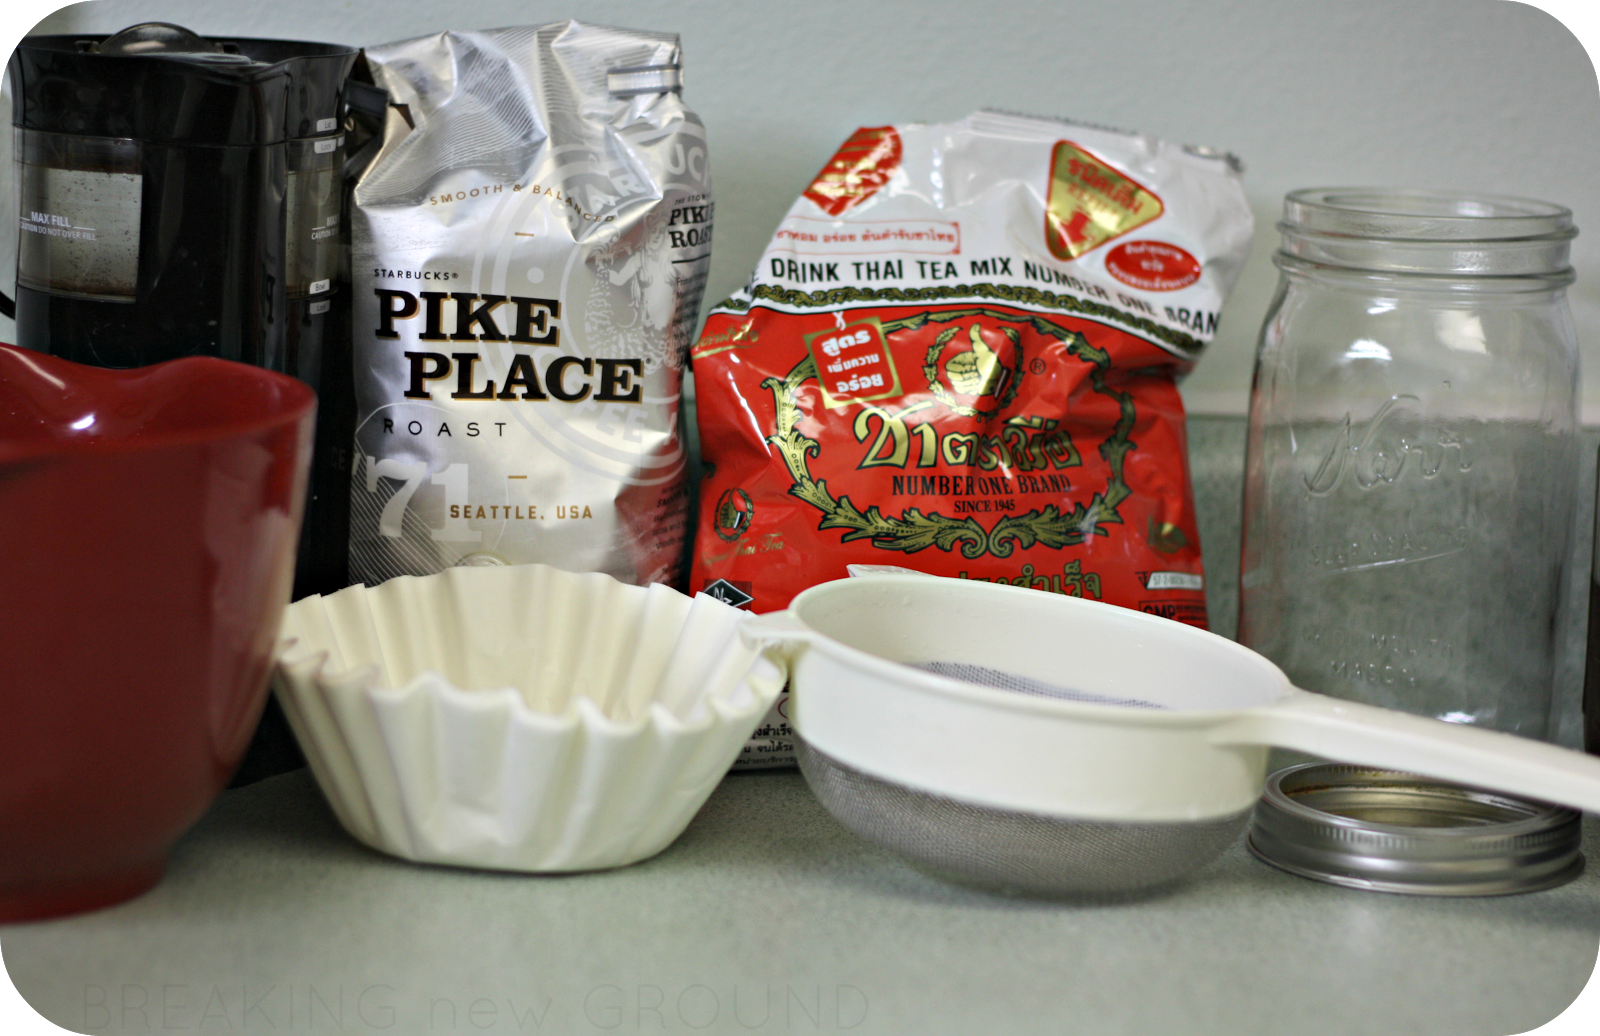
What you'll need:
  • 1 large glass jar with lid
  • loose leaf tea or ground coffee
  • large container to filter the tea/coffee into (preferably with a spout)
  • mesh strainer++
  • a coffee filter++ (I use paper, but you could probably get the same results with reusable)
  • time + patience
Cold brew is a plan-ahead drink as it needs more time to "brew" 4 hours at least to overnight. I've never tried drinking it as soon as 4 hours though, I've always let it sit at least overnight. 

1st measure out your tea or coffee into your glass jar. About 4 tsp/cup for the Thai tea, use the same ratios you use for hot coffee for iced (I never measure, just pour). 

2nd Fill the rest of the jar with filtered water, add lid, turn over to mix and place in fridge for 4-8 hours. 

3rd- the next day pull your chilled jar out of the fridge to strain. Place the mesh strainer over your bowl and add the coffee filter. Pour the tea/coffee in slowly and let it drip into the bowl until you've filtered it all. 

4th. add 4 ice cubes to a tall glass, for Thai tea I put in a generous amount (probably 3 tablespoons) of homemade simple syrup (recipe below), you can easily add it to your liking at the end. Then I pour in 1/4 cup of half + half and fill the rest of the way with the tea. Less half and half for coffee. Cold brew is MUCH less bitter so if you aren't into super sweet drinks, you may not need sugar at all!

5th Rinse out your jar and place the excess back in the fridge for drink #2 or even 3.


++I've even made cold brew in our french press by pouring it into the press when it was done brewing in the fridge. This is helpful if you don't have a mesh strainer or coffee filters. I have not tried this method with tea yet, but now I might!

Homemade Simple Syrup, liquid sweetener

This is super easy, like whoa. It's even easier if you have a hot water dispenser. Most of you may already know how to do this but I'm adding it for those that may ask if I were to leave it out!...

What you'll need:
2 cups sugar
2 cups water
heat proof bowl (I use my pyrex measuring cup)
funnel
glass bottle 

This can be made at any ratio I just make it 2 cups at a time. As long as you make it 1:1 with the sugar and water it'll work fine. 

1st heat the water to just boiling (not necessary if you have a hot water dispenser, yay!)

2nd add the sugar to your heat proof bowl

3rd stir the hot water into the sugar continuously until clear, not cloudy. 

4th. Let mixture cool to room temperature. 

5th funnel into a bottle or jar of your choice (I reused a Torani syrup bottle)

Tah-dah! So easy and so nice for iced drinks. Enjoy!

Friday, April 25, 2014

coming up...

So "40 Bags in 40 Days" is technically over, but we are still catching up on some areas that we missed or need the extra attention. I actually printed a 2nd progress chart without the dates so I could plan those things out for the next month or so. I do plan on posting a follow up when it's all finished...well as finished as it gets anyway. Decluttering is never a "one and done" deal around here. I have a feeling it's that way for most people.

I also got some questions recently about my last post and some things I shared on instagram relating to cold brew Thai tea. I'll put together a post on my method of cold brewing, it's pretty simple but I do it slightly different than others so I'll share that soon!

I'm also due for a pregnancy update. I've been scouring the internet for adorable ideas for our sweet little girl's room and we are getting pretty close. We're planning on gray walls but there are hundreds of shades and tones of gray so that has been a process of it's own! We are heading out to register tomorrow, I'm so giddy to be able to shop in the girls' section!

I haven't updated on the boys and what they've been up to for far too long. I'll make sure to do that soon as well. They are busy as ever, which is primarily what keeps me from blogging. I wouldn't have it any other way. 

I have some other fun tutorials that I've been working on since Christmas (whoops!) that are on the artsy/crafty side. I've been dabbling in sewing again but I'm nowhere near having the ability to teach anyone else much more than threading the needle...with an automatic threader. 


Easter has come + gone and we had a very full and very fun weekend, so that'll hopefully make it's way onto the blog as well. 

I'll make sure to get this space updated on all those things when I find a free moment. 

Happy Friday! 

Monday, April 21, 2014

DIY disposable tea bags- a quick tutorial

A series of events brought me to finding myself in need for a good way to steep loose-leaf tea. Prior to discovering a Thai tea that I HAD to have (I LOVE Thai iced tea) we didn't keep loose-leaf tea in the house. We mostly drink coffee and buy bags of our favorite varieties. Thus, I don't have a tea strainer/diffuser/thingy for my newly acquired tea.

First, I brewed it per the recommendations by mixing the tea straight into the hot water and then filtering through a coffee filter in a mesh strainer. This is similar to how I finish making a cold brewed coffee. It worked okay but takes a while for just one cup. So I googled DIY tea strainer and found a few tutorials that I adapted to make my own tea bags. It's pretty quick and easy but I only had time today to make 4 of them. 

I had a few people ask about my method when I instagrammed the process earlier today so I took pictures and decided to share the process here. 


Items needed:
  • loose leaf tea (1 tsp per bag fits best)
  • round paper coffee filters 
  • scissors
  • cotton string/yarn 
  • stapler + staples

See below the photo for the steps....


  1. Take 1 coffee filter and cut into 2 rectangles by cutting in half and then cutting the rounded edges straight. 
  2. Fold in half "hamburger style" (anyone? anyone?...) to create a crease. Put 1/2 teaspoon tea on each side of this crease. 
  3. Fold the long edges over the tea.
  4. Then place your finger on the crease and bring the two ends together. 
  5. place the end of your string at the top and fold one corner over, then place the other end of string and fold the other corner over it- creating a point. 
  6. Fold the point over then bring the string up and staple the string to the tea bag securing it shut. 
Don't forget to find a little helper to untie your moccasins and drive trucks around the kitchen...it's crucial to the process...

{oh, hello to baby sister too}


I brewed mine and then put it on ice. I'm wondering now if I could cold brew this like my coffee. I'm just following the directions the Thai tea came with...


Tah-dah! Quick and easy, but also pretty messy (only because I tried putting in too much tea the first time.). Enjoy! 


Thursday, May 16, 2013

back to cloth diapering + a discount code!


I've had a lot of response from friends and family wanting to know how I like cloth diapering. I have to say, that after being without cloth diapers for a week I actually MISSED IT! I didn't like using disposables again and I couldn't wait to get more diapers to get back into it.

If you read my last post, I did have a hygeine issue, but I loved them despite it. I came up with a simple solution. Just sew off the tabs so that "lint" cannot gather around the unreachable areas behind the snaps.

Ta-dah!


My wonderful "other mother" brought her sewing machine to instruct me on the best way to do it, and then we worked side by side to sew all 40 of our Just Simply Baby pocket diapers. In the time I did 15 she did 25...she probably could have done this project with her eyes closed. Meanwhile, my machine kept binding up on me. Anyway, we did it, it was SIMPLE and now the diapers we adore are back and being put to good use.


For those interested, we used a "stretch stitch" but a single line would work just fine, maybe not as durable though. Now any lint that gathers in the corners can easily be washed away by turning the diapers inside out. My "germaphobe" side is quite happy now. And just an FYI, the whole lint issue with pocket diapers isn't just one brand. We tried a handful of brands and they all had the same issues where the snaps attach to both layers of the diapers.  From what I've read in my online research, most people don't mind having to pick out the lint by hand every once in awhile. I have zero time or patience for that remedy. Having used our modified diapers for some time now, I am quite happy with the solution.


The diapers we use are the usual PUL outer, fleece inner, and our inserts are a blend of microfiber and bamboo. Previously I had been using microfiber inserts. In the couple months I've been using cloth diapers I have found there are pros and cons to each. The microfiber are quite bulky and we double them up for overnight. No leaks, but REALLY bulky diaper. The "micro boo" are thinner and seemingly more dense, which makes for a more trim fit. However, they are smoother and sort of "floppy" which means that when we put Des in a new diaper we have to flatten out the insert first. We learned that after an unexpected leak. I haven't noticed any different in absorbency between the two but I've read the bamboo is much more absorbent than microfiber.

Aside from a few learning moments (aka user error) we have had no leaks, even overnight. I'm also using wet bags from JSB and we did try out some of their cloth wipes. They are a little too thick for us, made from two layers of flannel. We are also using their cloth safe diaper cream, which works great!

We have also tried Fuzzibunz brand diapers-which I like, but don't see much reason to spend so much more on them, Knickernappies- which we didn't like. I think part of that was a sizing issue, but we also weren't a fan of the front snapping around the sides (reverse from most diapers), and a couple other brands, one of which had a PUL outer and a cotton "prefold" type inner which we didn't like at all.


The Just Simply Baby diapers that we are using are by far our favorites. The diapers are all "one size" with plenty of snaps to adjust from newborn to toddler.  They are almost always running a fabulous daily deal. Not to mention, if you "like" their page on Facebook, you'll be sure to catch their awesome giveaways and contests. I actually won a recent contest with these two pattern entries. When they print new patterns I'll receive a free diaper in each of these!


I've also joined their affiliate program, which is good news for you because I have a 10% discount code good for your first Just Simply Baby order! Using this code means you'll receive 10% off of your entire order, even if you're purchasing already discounted items or a package deal.

{EXPIRED 11/2013 please shop with this link for diaper deals}


Be sure to enter my referral code at check out and you will receive your 10% as a refund after your order is processed. Pretty easy! Best of ALL is they have 30-day money back guarantee, even if you've used the diapers. That's better than any other deal I've seen out there. All you are lost on is shipping costs (FYI they do not take returns on cloth wipes or opened diaper creams).


That's the update on where we are in our cloth diapering journey so far. We have been experimenting with different types of cloth wipes and last week Ben installed a diaper sprayer. More on how those things are going for us when we've had a little more experience. Number one, we are saving money every month!


Although I am part of Just Simply Baby's affiliate program, this is a non-sponsored review. I did not receive any items nor perks for posting this review of their product. I did contact Just Simply Baby and received their images/logos and permissions to use them for this post. 

Tuesday, January 1, 2013

Let's Play Catch Up {December 2012}

Hi. I'm Shandell. I blog here sometimes. Remember me?

Oy. It's been a long time since I've sat down and updated {again} and there is a lot to talk about...hence the not having time to blog about it.

Well- last time I posted we were smack dab in the middle of a very hectic schedule. Ben had 3+ weeks of intense practice every night for the drama at church. It didn't take long for us to figure out that when you start doing more to further the kingdom of God, that the enemy attacks. He tried hard and we were down for a bit, but we got back up. Des suddenly wouldn't go to sleep for me, but once Ben got home and held him he would be out in less than 10 minutes. We had sickness throughout the house, and I broke my toe one night just when Ben was about to leave. Amidst all that I was left to prepare for Christmas on my own. I found joy in knowing that God had good planned through it all and in the end, at least 12 people decided to walk with Jesus because of the message conveyed through the drama.

Early in the month we actually made time to go get our tree at a farm, see the fire truck light parade go by a few blocks away, and prepare for and attend a cookie exchange.
{tree farm!}
{firetruck light parade}
{a sampling of my holiday projects}


In just one month Malakai got a new bed, his first desk, and a lit Christmas tree in his room. A lot of "firsts" for this guy. He was just a "little" excited.

On December 18th we had a pretty decent snow. It was a bit wet, but it stuck and looked beautiful for about 8 hours. Kai made his first snowball, which he promptly threw at me. Then subsequent others that he threw at his brother. We also made our 1st snowman together (last year I ended up making it all on my own). Desmond loved stomping around in the snow and found himself a puddle to play in. boys. 


We had a staff Christmas lunch at the church, a small group dinner that we hosted, welcomed a few new babies, and then we started Christmas celebrations early on the 22nd with Ben's side of the family.

{Pottorf Family Christmas}

Christmas Eve Malakai helped make cookies for Santa for the first time. We wrote him a letter as well. That night we usually attend the candlelight service at church but Desmond had a nasty cold so we had a quite evening. Christmas day we went 3 different places, Des was coughing so hard that day he puked 4 times (twice on me), the next day it was still so bad Ben stayed home (we were up all night). Then we had a couple days to prepare for the next round of Christmas celebrations.

{Christmas Eve Traditions: new jammies, cookies for Santa, story with daddy}
{Christmas morning stockings, Christmas evening with family}

The 29th was my birthday and on our way to a family outing Ben planned, Kai got car sick...once again, it was on me. The night of the 30th we had immediate families over for dinner to celebrate my birthday, that night Ben got sick...thankfully NOT on me. He was up all night getting sick and I was up with the boys half the night because their routine with daddy was thrown off. Even still, I enjoyed my birthday and we got through it.

{for my birthday- a pegboard for my kitchen, a necklace Kai made, boots I can't wear, and snuggles with my boys- yes Kai is asleep.}


Yesterday, New Year's Eve, we had our final Christmas gathering. Ben stayed home sick, and I took the boys for a bit. They faded fast so we left early and we were all in bed before midnight.

Today we all took it easy as Ben is still recovering from his stomach flu, and we are praying that nobody else in the house gets it next.

Needless to say, I fell behind in just about everything. House work (especially after the broken toe), Christmas prep, my part-time job at the church. I guess you could say my "resolution" for 2013 is to catch up! Now that most of our big events are out of the way I feel like I can breath and start to pick up the pieces (literally!).

I honestly feel so incredibly blessed. When I had hurt my foot I had family come over a few nights and help me with the boys while Ben was at play practice. Between Christmas and my birthday, we were showered with gifts. Not just material things, but gifts of presence and love as well.

2012 surely made itself known in our family's history books and I'm looking forward to the blessings and lessons that 2013 will hold for us.

Sunday, August 26, 2012

Desmond's 1st haircut

I'm still behind on some things but I couldn't wait to skip over those for a moment and post some shots of Desmond's first haircut which just happened yesterday.

Here is our boy before his much needed haircut. I think he's precious, but admit that it was about time to get the hair out of his eyes.


 I must say, I do NOT recommend cutting a 10 month old's hair yourself. It was so difficult and in my opinion a bit of a disaster with all his wiggling around. He got pretty fussy and I had to call it quits...


I feel like he's nearly sporting a "Dumb and Dumber" style here...yikes. It was the best I could do with all the moving he insisted on doing. My heart stopped a couple time when he swung his face or a hand toward the scissors. 

Today after nap I let him play with some bath toys and did my best to correct some of the funky spots. It looks better and he is looking much too old!


Monday, August 20, 2012

DIY decor

While I wait on some laundry (yahoo!) I'm working on some prints today. I can't wait to hang these in Kai's room...


Ben + I sang this song over and over to Malakai when he was a baby. After all those sleepless nights, it's still a favorite in our house.

Tuesday, April 3, 2012

DIY: Reupholstered (and kid-proof!) Dining Room Chairs

Look everyone, I'm posting something on my blog besides an apology for not posting something on my blog in forever! Not only that, but it's a tutorial, which means I've made myself do something besides work recently!

This past weekend Ben + Kai played out back while I whisked Desmond away for a quick trip to the store. I wanted to get some groceries as well as some fabric as quickly as possible...so I went to the big fat Walmart because yes, they have both.

I've been meaning to reupholster my dining room chairs for at least 2 years now, ever since the cats we used to own tore up the original fabric. The desire to fix them up increased when Kai started spilling things on them after we moved him from a high chair to a booster. Now he insists on sitting in the chair without the booster and sadly this coincided with a potty training accident which left us with a ruined chair pad...so the need for new fabric (and padding!) became much more urgent.

I grabbed way too much fabric (I'm a total beginner at yardage and such) and just enough vinyl. Since I planned on using clear plastic vinyl over the fabric I just chose the cheapest version of what Ben + I both liked the most, which was a dark red. Then I asked the gal working there which weight of vinyl I should choose and she suggested the medium one. I also grabbed a small package of cotton batting to replace the ruined chair pad. It all came to about $25.

When I got home and the boys were down for nap, Ben helped me take the chairs apart. At first I planned on removing the fabric from all the pads but after how long it took for just the ruined one we decided that was far too much work and it would be fine to just cover the other 3 chairs.

Here's a little before picture of how bad the chairs looked, along with me working on taking one apart.

Photobucket

I had planned on taking the chair apart before going shopping to see what I was working with. That didn't happen which led to me wishing I would have purchased a foam chair pad instead of the cotton batting but I didn't want to waste precious time so I just used the whole roll to replace the one cushion. 

null

You can see the scratches from the cats on the pad to the right. We've been putting this off for FAR too long! The pad on the left is the batting I purchased which I just cut to a little bigger all the way around than the cushion, since the cushion had some overlap to go around the wooden seat of the chair. 

Then I used the cushions to roughly measure how big my squares of fabric + vinyl needed to be and cut. Next I ironed all 4 squares of fabric, while lamenting over having purchased far too much red fabric. Thankfully this is such a lovely color (my fave) so I'm sure I'll find other uses for it down the road. Lesson learned...and a much better one than having too little fabric. 

null

Somewhere in here the boys woke up and Ben left me to my project. As you can see my workspace was in our garage because in our teensy house there just isn't a lot of open space, especially once the boys are up and about.

Next I just put the fabric onto the table (Ben brought the dining room table out for me to have an elevated and clean work surface), then the cushion upside down on to the fabric and began stapling like crazy. I started at the front of the chair, stapled the middle and worked my way out to the corner of each edge. I also had to use a hammer since our staple gun is light-duty and the chair seats were rather thick.

When I got all the edges done I folded the corners as nicely and tightly as possible without making the fabric pucker on the other side.

Photobucket

I found all sorts of help online by searching for "reupholstering dining chair seat". Reading through a couple sites helped me visualize the best way to go about the process. Next though, I could find nothing on how to cover seats in vinyl. I wasn't so sure about how to fold the corners since a sturdy plastic doesn't fold or lay as nicely as fabric. I just had to figure it out myself.

I started the same way I had with the fabric, by doing all the edges first. When I got to the corners I had to figure out what would work best. I wanted to make sure to cover evenly but not have a bulky piece of plastic. I just snipped one edge (as pictured below) so that when I folded the corner up there was one less layer of plastic to work with. 

Photobucket

So I just kept going as I had with the fabric and stapled down all the corners by pulling tight around the edges. With the vinyl, there's a bit of space on each corner between it and the fabric, but it isn't very noticeable. Otherwise, my little technique worked! Take that internet!

Photobucket

All shiny and new! Next I traded posts with Ben and hung out with the boys while he attached the seats to the frames with the original screws. After just a few hours of work (including shopping for supplies!) we had new chairs!

null

I just love the way they look, they now match our kitchen decor. My favorite is how the red pops against the grey wall. Actually, my MOST favorite part is how my son can spill all over these and I can just wipe them off...

Photobucket

At this season in our life, having wipeable furniture is a must if anything is going to last through not one, but two toddler boys! Spill away kiddos, spill away!

After I did this I also got a tip from a friend that you can reupholster/kid proof furniture by using waterproof shower curtains as your fabric. Has anyone done this or something similar to toddler-proof at home? I just love a good tip to keep things from getting ruined or having to keep the boys off of certain things. Again, with the size of our house, it's just not very doable to have much be off limits. 

What's your favorite DIY?

Related Posts Plugin for WordPress, Blogger...

certified site

certified site