Showing posts with label tutorial. Show all posts

Thursday, May 1, 2014

Cold Brew Thai Tea or Coffee {and simple syrup} Recipe

I've said it once and I'll say it again, I love Thai iced tea! We hardly ever eat out, but when we have the treat of going out for Thai food I always get one. It goes perfectly with spicy food because of how sweet + creamy it is. I've always wanted to recreate this treat on my own but never found a tutorial easy enough for what I wanted. I didn't want to have to buy all the individual spices and prepare them, I wanted something in tea bag form or as close to it as possible.

A couple weeks ago I was browsing blogs in my feedly when I came across a recipe for blended Thai iced tea. The recommended a loose leaf Thai tea that I could order from Amazon, I had to have it! Ben ordered it for me and when it came I brewed it per the instructions as best I could. I brewed it hot at first and strained it through a coffee filter, then I tried making my own tea bags which worked great but was too time consuming for the amount of tea I wanted. Next I tried cold brew, which is how I make iced coffee at home. There are plenty of methods for cold brewing from what containers you use to how you filter it. I tend to use what I have on hand whenever possible, which is how I came up
with this method a couple years ago.
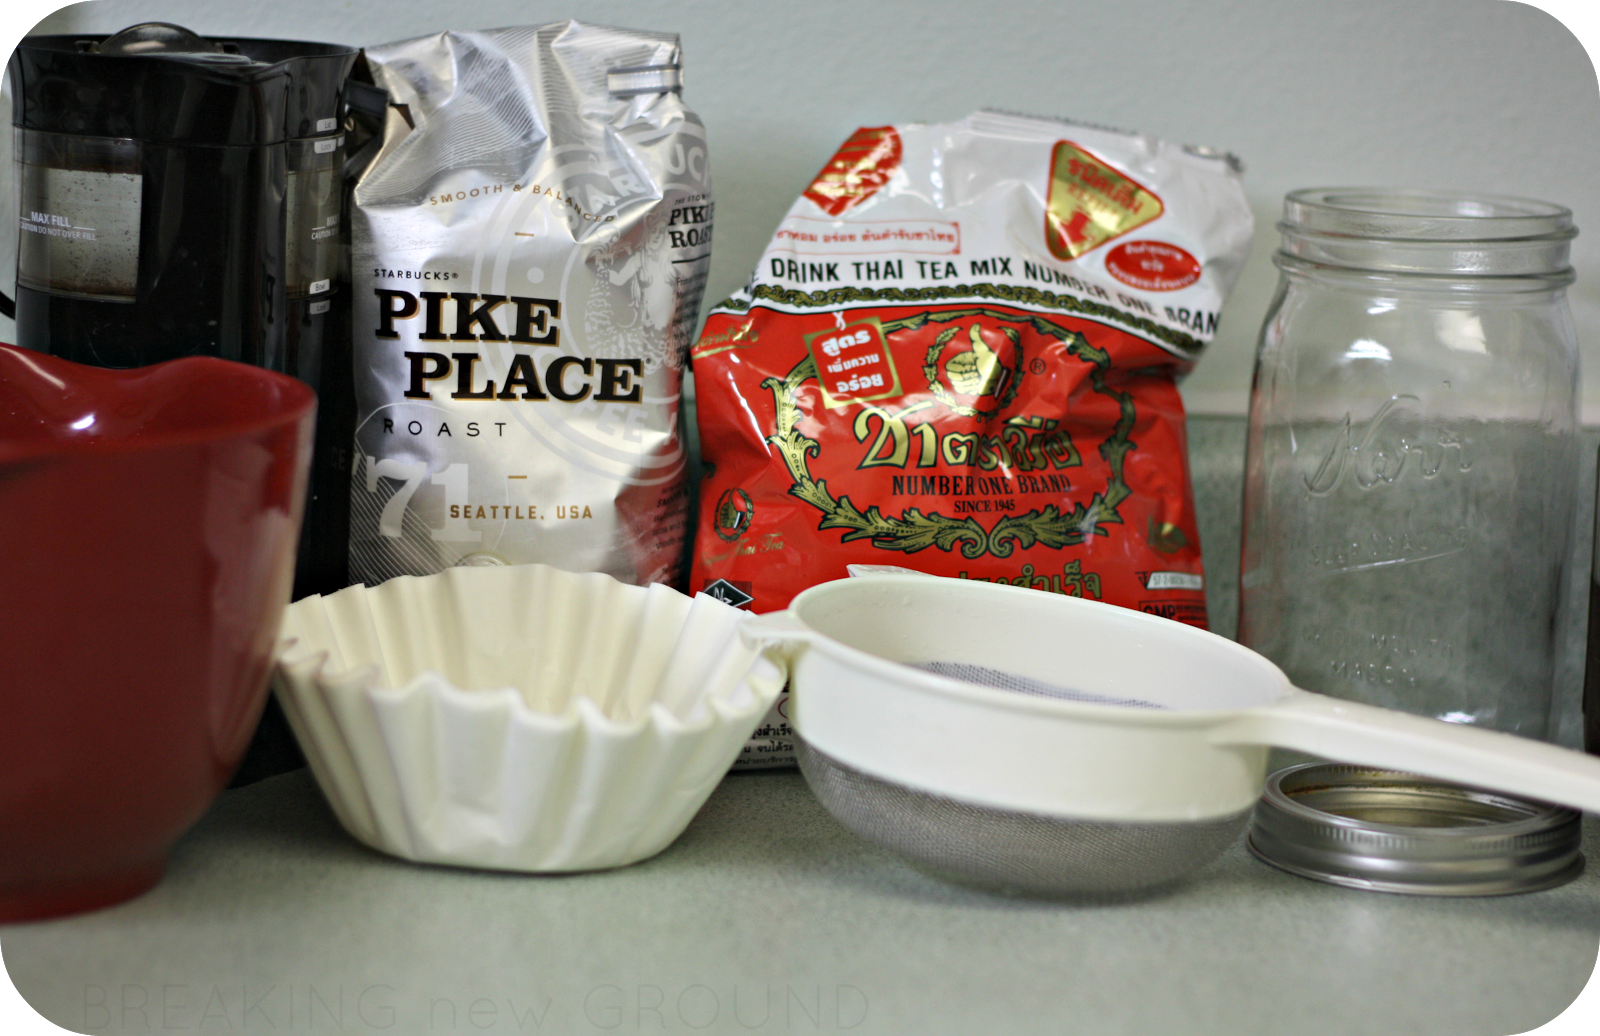


Cold Brewed Thai Tea, or Coffee 
(this will make a small batch, 2-3 servings)

What you'll need:
  • 1 large glass jar with lid
  • loose leaf tea or ground coffee
  • large container to filter the tea/coffee into (preferably with a spout)
  • mesh strainer++
  • a coffee filter++ (I use paper, but you could probably get the same results with reusable)
  • time + patience
Cold brew is a plan-ahead drink as it needs more time to "brew" 4 hours at least to overnight. I've never tried drinking it as soon as 4 hours though, I've always let it sit at least overnight. 

1st measure out your tea or coffee into your glass jar. About 4 tsp/cup for the Thai tea, use the same ratios you use for hot coffee for iced (I never measure, just pour). 

2nd Fill the rest of the jar with filtered water, add lid, turn over to mix and place in fridge for 4-8 hours. 

3rd- the next day pull your chilled jar out of the fridge to strain. Place the mesh strainer over your bowl and add the coffee filter. Pour the tea/coffee in slowly and let it drip into the bowl until you've filtered it all. 

4th. add 4 ice cubes to a tall glass, for Thai tea I put in a generous amount (probably 3 tablespoons) of homemade simple syrup (recipe below), you can easily add it to your liking at the end. Then I pour in 1/4 cup of half + half and fill the rest of the way with the tea. Less half and half for coffee. Cold brew is MUCH less bitter so if you aren't into super sweet drinks, you may not need sugar at all!

5th Rinse out your jar and place the excess back in the fridge for drink #2 or even 3.


++I've even made cold brew in our french press by pouring it into the press when it was done brewing in the fridge. This is helpful if you don't have a mesh strainer or coffee filters. I have not tried this method with tea yet, but now I might!

Homemade Simple Syrup, liquid sweetener

This is super easy, like whoa. It's even easier if you have a hot water dispenser. Most of you may already know how to do this but I'm adding it for those that may ask if I were to leave it out!...

What you'll need:
2 cups sugar
2 cups water
heat proof bowl (I use my pyrex measuring cup)
funnel
glass bottle 

This can be made at any ratio I just make it 2 cups at a time. As long as you make it 1:1 with the sugar and water it'll work fine. 

1st heat the water to just boiling (not necessary if you have a hot water dispenser, yay!)

2nd add the sugar to your heat proof bowl

3rd stir the hot water into the sugar continuously until clear, not cloudy. 

4th. Let mixture cool to room temperature. 

5th funnel into a bottle or jar of your choice (I reused a Torani syrup bottle)

Tah-dah! So easy and so nice for iced drinks. Enjoy!

Friday, April 25, 2014

coming up...

So "40 Bags in 40 Days" is technically over, but we are still catching up on some areas that we missed or need the extra attention. I actually printed a 2nd progress chart without the dates so I could plan those things out for the next month or so. I do plan on posting a follow up when it's all finished...well as finished as it gets anyway. Decluttering is never a "one and done" deal around here. I have a feeling it's that way for most people.

I also got some questions recently about my last post and some things I shared on instagram relating to cold brew Thai tea. I'll put together a post on my method of cold brewing, it's pretty simple but I do it slightly different than others so I'll share that soon!

I'm also due for a pregnancy update. I've been scouring the internet for adorable ideas for our sweet little girl's room and we are getting pretty close. We're planning on gray walls but there are hundreds of shades and tones of gray so that has been a process of it's own! We are heading out to register tomorrow, I'm so giddy to be able to shop in the girls' section!

I haven't updated on the boys and what they've been up to for far too long. I'll make sure to do that soon as well. They are busy as ever, which is primarily what keeps me from blogging. I wouldn't have it any other way. 

I have some other fun tutorials that I've been working on since Christmas (whoops!) that are on the artsy/crafty side. I've been dabbling in sewing again but I'm nowhere near having the ability to teach anyone else much more than threading the needle...with an automatic threader. 


Easter has come + gone and we had a very full and very fun weekend, so that'll hopefully make it's way onto the blog as well. 

I'll make sure to get this space updated on all those things when I find a free moment. 

Happy Friday! 

Monday, April 21, 2014

DIY disposable tea bags- a quick tutorial

A series of events brought me to finding myself in need for a good way to steep loose-leaf tea. Prior to discovering a Thai tea that I HAD to have (I LOVE Thai iced tea) we didn't keep loose-leaf tea in the house. We mostly drink coffee and buy bags of our favorite varieties. Thus, I don't have a tea strainer/diffuser/thingy for my newly acquired tea.

First, I brewed it per the recommendations by mixing the tea straight into the hot water and then filtering through a coffee filter in a mesh strainer. This is similar to how I finish making a cold brewed coffee. It worked okay but takes a while for just one cup. So I googled DIY tea strainer and found a few tutorials that I adapted to make my own tea bags. It's pretty quick and easy but I only had time today to make 4 of them. 

I had a few people ask about my method when I instagrammed the process earlier today so I took pictures and decided to share the process here. 


Items needed:
  • loose leaf tea (1 tsp per bag fits best)
  • round paper coffee filters 
  • scissors
  • cotton string/yarn 
  • stapler + staples

See below the photo for the steps....


  1. Take 1 coffee filter and cut into 2 rectangles by cutting in half and then cutting the rounded edges straight. 
  2. Fold in half "hamburger style" (anyone? anyone?...) to create a crease. Put 1/2 teaspoon tea on each side of this crease. 
  3. Fold the long edges over the tea.
  4. Then place your finger on the crease and bring the two ends together. 
  5. place the end of your string at the top and fold one corner over, then place the other end of string and fold the other corner over it- creating a point. 
  6. Fold the point over then bring the string up and staple the string to the tea bag securing it shut. 
Don't forget to find a little helper to untie your moccasins and drive trucks around the kitchen...it's crucial to the process...

{oh, hello to baby sister too}


I brewed mine and then put it on ice. I'm wondering now if I could cold brew this like my coffee. I'm just following the directions the Thai tea came with...


Tah-dah! Quick and easy, but also pretty messy (only because I tried putting in too much tea the first time.). Enjoy! 


Wednesday, January 8, 2014

How to enter a Rafflecopter Giveaway

After trying out the new fangled way of doing giveaway entries with widgets, it seems that a large number of my readers had a hard time figuring out how to complete the entries properly. Sadly, this meant that many entries did not count. I'd hate for you to attempt to enter only to be disqualified. So, before my next big giveaway I wanted to help you all out by sharing a how-to with some additional tips.

Watch the short video below for a quick overview of the basics...


If you need additional help with these basics, head to THIS post on Rafflecopter's blog for more details.


Some in-depth tips for entering giveaways here at BNG: 

1. The biggest thing is that you have to pay attention to the details. Each entry is going to ask you to complete certain tasks, you must do these tasks or your entry won't count. I have a feeling some people just click on the submit button and forget to do the rest. Verification of your tasks being completed is how you are eligible to win via your entries. 

2. Complete the MANDATORY entry correctly or the rest of your work doesn't count. The last two giveaways have had a mandatory first entry that when completed, unlocked additional entries. The bummer is, if you don't complete the mandatory entry correctly, your extra ones don't count either. Here's a little visual. My notes are in blue, marks to highlight areas on orange. 


I've set mandatory entries similar to the one above-  "visit the featured shop's website, then comment on the giveaway post with your favorite item they sell." My first Rafflecopter giveaway, half the entrants didn't leave a comment at all. A few others just commented and said something basic like "great giveaway!"….that doesn't count either for that particular entry. A comment like "My favorite item is the grey infinity scarf." would be perfect. The point is to get you to check out the featured shop, then comment on the post with the proof! Got it? 

3. Lastly pay attention to the details and verify your work in the additional entries. The entries are going to have tasks for you to perform before clicking to receive credit will count as another entry under your name. Some examples include: 
  • favorite an Etsy shop- you will be asked to leave your Etsy username to verify
  • follow a twitter account- you will need to leave your twitter username to verify
  • tweet about a giveaway- you will be asked to leave a link to the tweet to verify
  • like a Facebook page- Rafflecopter verifies this one automatically, just hit "like" 
  • like a Facebook status or photo- you will need to leave your Facebook username to verify
  • comment on Facebook- you will need to leave your Facebook username to verify
  • visit another blog- you will be asked to comment on that blog post and leave the name you            commented under on rafflecopter 
Some of these entries are right on the Rafflecopter form, so you don't have to go to another website. Others you'll have to head over to Facebook, Etsy, or someone's blog. They're all relatively quick to complete.

Please take note that I will NEVER set an entry that requires you to post or share something on your Facebook timeline. While I think it's a great way to share pages, blogs, and shops with your friends, it's against Facebook's policies to ask users to advertise on their timeline for contest entries. However, in the upcoming giveaway, I it is okay to encourage you to share on your timeline, it just cannot be in exchange for anything (i.e. a contest entry) or it would be considered advertising.

I hope I've clarified everything that may have kept many of you from entering correctly, or perhaps at all. If you are still confused, or have specific questions feel free to leave a comment below, or on my Facebook page. You can also email me or send a private message on Facebook.

Thanks to all of you who have entered giveaways here at Breaking New Ground. The more entries each gets means more and bigger giveaways in the future, so don't hesitate to enter and encourage your friends to do so as well so I can keep offering fun opportunities to learn about new and different shops through giveaways!

Tuesday, April 3, 2012

DIY: Reupholstered (and kid-proof!) Dining Room Chairs

Look everyone, I'm posting something on my blog besides an apology for not posting something on my blog in forever! Not only that, but it's a tutorial, which means I've made myself do something besides work recently!

This past weekend Ben + Kai played out back while I whisked Desmond away for a quick trip to the store. I wanted to get some groceries as well as some fabric as quickly as possible...so I went to the big fat Walmart because yes, they have both.

I've been meaning to reupholster my dining room chairs for at least 2 years now, ever since the cats we used to own tore up the original fabric. The desire to fix them up increased when Kai started spilling things on them after we moved him from a high chair to a booster. Now he insists on sitting in the chair without the booster and sadly this coincided with a potty training accident which left us with a ruined chair pad...so the need for new fabric (and padding!) became much more urgent.

I grabbed way too much fabric (I'm a total beginner at yardage and such) and just enough vinyl. Since I planned on using clear plastic vinyl over the fabric I just chose the cheapest version of what Ben + I both liked the most, which was a dark red. Then I asked the gal working there which weight of vinyl I should choose and she suggested the medium one. I also grabbed a small package of cotton batting to replace the ruined chair pad. It all came to about $25.

When I got home and the boys were down for nap, Ben helped me take the chairs apart. At first I planned on removing the fabric from all the pads but after how long it took for just the ruined one we decided that was far too much work and it would be fine to just cover the other 3 chairs.

Here's a little before picture of how bad the chairs looked, along with me working on taking one apart.

Photobucket

I had planned on taking the chair apart before going shopping to see what I was working with. That didn't happen which led to me wishing I would have purchased a foam chair pad instead of the cotton batting but I didn't want to waste precious time so I just used the whole roll to replace the one cushion. 

null

You can see the scratches from the cats on the pad to the right. We've been putting this off for FAR too long! The pad on the left is the batting I purchased which I just cut to a little bigger all the way around than the cushion, since the cushion had some overlap to go around the wooden seat of the chair. 

Then I used the cushions to roughly measure how big my squares of fabric + vinyl needed to be and cut. Next I ironed all 4 squares of fabric, while lamenting over having purchased far too much red fabric. Thankfully this is such a lovely color (my fave) so I'm sure I'll find other uses for it down the road. Lesson learned...and a much better one than having too little fabric. 

null

Somewhere in here the boys woke up and Ben left me to my project. As you can see my workspace was in our garage because in our teensy house there just isn't a lot of open space, especially once the boys are up and about.

Next I just put the fabric onto the table (Ben brought the dining room table out for me to have an elevated and clean work surface), then the cushion upside down on to the fabric and began stapling like crazy. I started at the front of the chair, stapled the middle and worked my way out to the corner of each edge. I also had to use a hammer since our staple gun is light-duty and the chair seats were rather thick.

When I got all the edges done I folded the corners as nicely and tightly as possible without making the fabric pucker on the other side.

Photobucket

I found all sorts of help online by searching for "reupholstering dining chair seat". Reading through a couple sites helped me visualize the best way to go about the process. Next though, I could find nothing on how to cover seats in vinyl. I wasn't so sure about how to fold the corners since a sturdy plastic doesn't fold or lay as nicely as fabric. I just had to figure it out myself.

I started the same way I had with the fabric, by doing all the edges first. When I got to the corners I had to figure out what would work best. I wanted to make sure to cover evenly but not have a bulky piece of plastic. I just snipped one edge (as pictured below) so that when I folded the corner up there was one less layer of plastic to work with. 

Photobucket

So I just kept going as I had with the fabric and stapled down all the corners by pulling tight around the edges. With the vinyl, there's a bit of space on each corner between it and the fabric, but it isn't very noticeable. Otherwise, my little technique worked! Take that internet!

Photobucket

All shiny and new! Next I traded posts with Ben and hung out with the boys while he attached the seats to the frames with the original screws. After just a few hours of work (including shopping for supplies!) we had new chairs!

null

I just love the way they look, they now match our kitchen decor. My favorite is how the red pops against the grey wall. Actually, my MOST favorite part is how my son can spill all over these and I can just wipe them off...

Photobucket

At this season in our life, having wipeable furniture is a must if anything is going to last through not one, but two toddler boys! Spill away kiddos, spill away!

After I did this I also got a tip from a friend that you can reupholster/kid proof furniture by using waterproof shower curtains as your fabric. Has anyone done this or something similar to toddler-proof at home? I just love a good tip to keep things from getting ruined or having to keep the boys off of certain things. Again, with the size of our house, it's just not very doable to have much be off limits. 

What's your favorite DIY?

Related Posts Plugin for WordPress, Blogger...

certified site

certified site