Showing posts with label food. Show all posts

Thursday, May 1, 2014

Cold Brew Thai Tea or Coffee {and simple syrup} Recipe

I've said it once and I'll say it again, I love Thai iced tea! We hardly ever eat out, but when we have the treat of going out for Thai food I always get one. It goes perfectly with spicy food because of how sweet + creamy it is. I've always wanted to recreate this treat on my own but never found a tutorial easy enough for what I wanted. I didn't want to have to buy all the individual spices and prepare them, I wanted something in tea bag form or as close to it as possible.

A couple weeks ago I was browsing blogs in my feedly when I came across a recipe for blended Thai iced tea. The recommended a loose leaf Thai tea that I could order from Amazon, I had to have it! Ben ordered it for me and when it came I brewed it per the instructions as best I could. I brewed it hot at first and strained it through a coffee filter, then I tried making my own tea bags which worked great but was too time consuming for the amount of tea I wanted. Next I tried cold brew, which is how I make iced coffee at home. There are plenty of methods for cold brewing from what containers you use to how you filter it. I tend to use what I have on hand whenever possible, which is how I came up
with this method a couple years ago.


Cold Brewed Thai Tea, or Coffee 
(this will make a small batch, 2-3 servings)
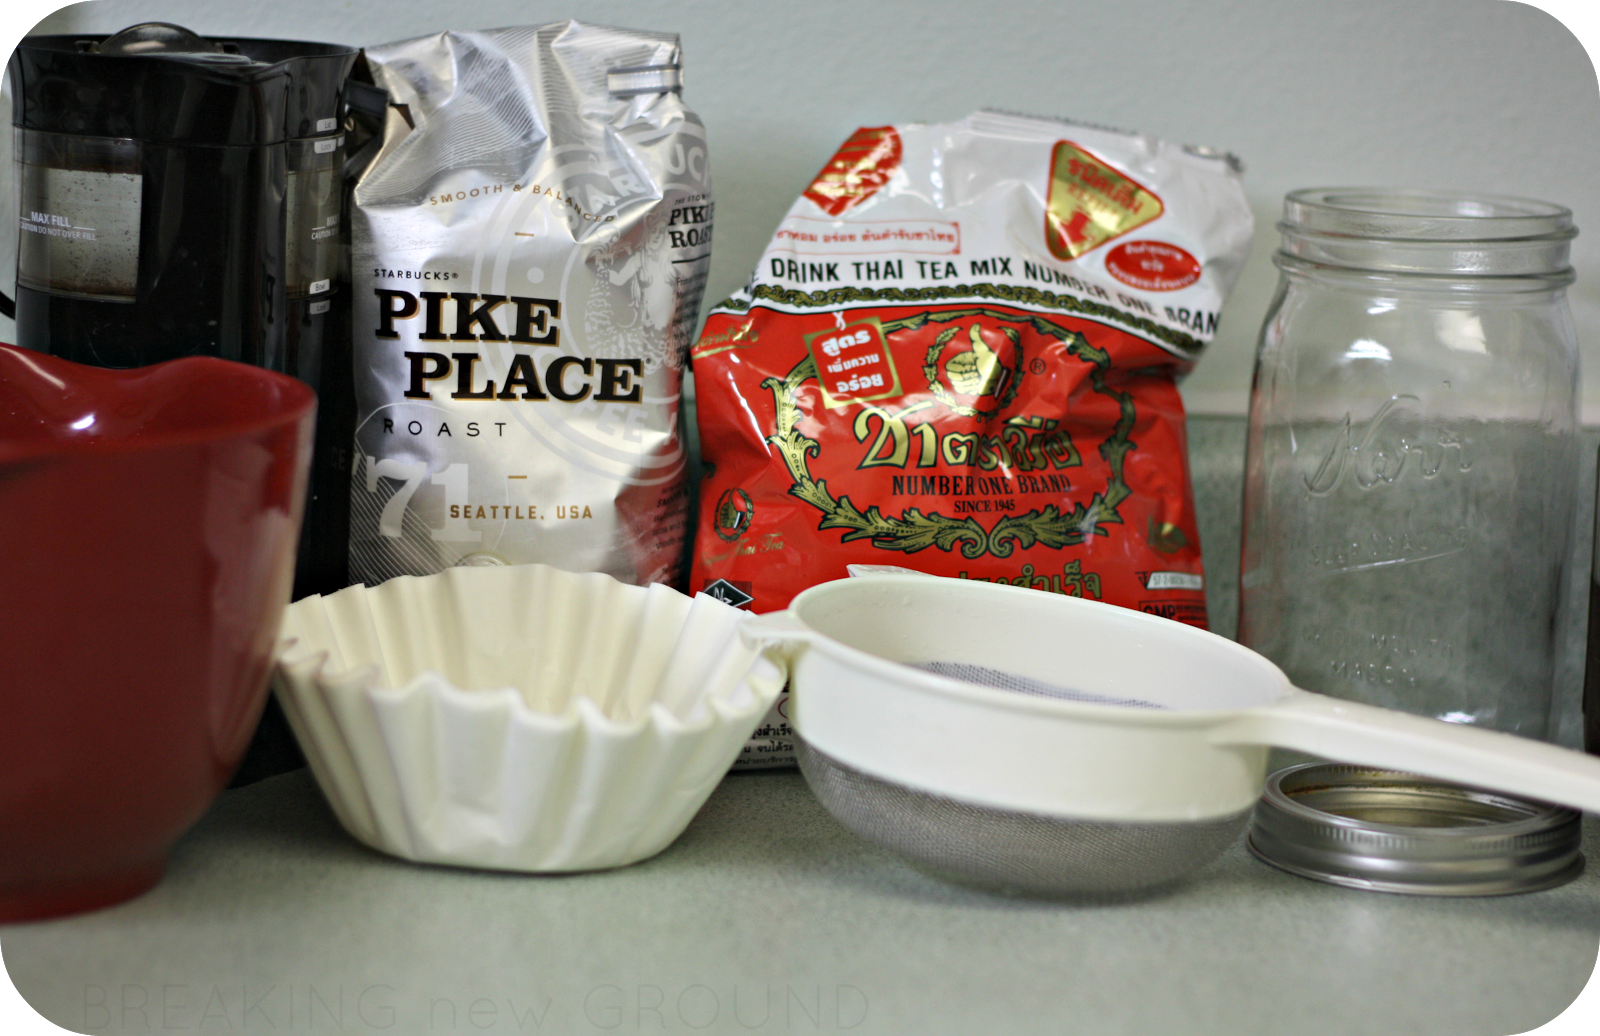
What you'll need:
  • 1 large glass jar with lid
  • loose leaf tea or ground coffee
  • large container to filter the tea/coffee into (preferably with a spout)
  • mesh strainer++
  • a coffee filter++ (I use paper, but you could probably get the same results with reusable)
  • time + patience
Cold brew is a plan-ahead drink as it needs more time to "brew" 4 hours at least to overnight. I've never tried drinking it as soon as 4 hours though, I've always let it sit at least overnight. 

1st measure out your tea or coffee into your glass jar. About 4 tsp/cup for the Thai tea, use the same ratios you use for hot coffee for iced (I never measure, just pour). 

2nd Fill the rest of the jar with filtered water, add lid, turn over to mix and place in fridge for 4-8 hours. 

3rd- the next day pull your chilled jar out of the fridge to strain. Place the mesh strainer over your bowl and add the coffee filter. Pour the tea/coffee in slowly and let it drip into the bowl until you've filtered it all. 

4th. add 4 ice cubes to a tall glass, for Thai tea I put in a generous amount (probably 3 tablespoons) of homemade simple syrup (recipe below), you can easily add it to your liking at the end. Then I pour in 1/4 cup of half + half and fill the rest of the way with the tea. Less half and half for coffee. Cold brew is MUCH less bitter so if you aren't into super sweet drinks, you may not need sugar at all!

5th Rinse out your jar and place the excess back in the fridge for drink #2 or even 3.


++I've even made cold brew in our french press by pouring it into the press when it was done brewing in the fridge. This is helpful if you don't have a mesh strainer or coffee filters. I have not tried this method with tea yet, but now I might!

Homemade Simple Syrup, liquid sweetener

This is super easy, like whoa. It's even easier if you have a hot water dispenser. Most of you may already know how to do this but I'm adding it for those that may ask if I were to leave it out!...

What you'll need:
2 cups sugar
2 cups water
heat proof bowl (I use my pyrex measuring cup)
funnel
glass bottle 

This can be made at any ratio I just make it 2 cups at a time. As long as you make it 1:1 with the sugar and water it'll work fine. 

1st heat the water to just boiling (not necessary if you have a hot water dispenser, yay!)

2nd add the sugar to your heat proof bowl

3rd stir the hot water into the sugar continuously until clear, not cloudy. 

4th. Let mixture cool to room temperature. 

5th funnel into a bottle or jar of your choice (I reused a Torani syrup bottle)

Tah-dah! So easy and so nice for iced drinks. Enjoy!

Tuesday, March 25, 2014

our IKEA haul

Well, we survived IKEA last weekend  2 weekends ago (I've had computer issues keeping me from posting this update until now).  On the way up with Ben's parents we were telling them that the stigma is that people get frustrated at IKEA and it puts a strain on relationships. We joked about stepping away from each other if the other couple needed space to have a discussion. I can see how it can be an overwhelming place, but if you go in with a positive outlook and with a goal it's so fun!

{we hit up Starbucks on our way out of Eugene}


When we arrived we started at the food court. I felt like the IKEA tour guide, Ben had been once with me years and years ago and Ron + Debbie had never been. I pointed everyone towards the flow of traffic to get our lunches and we ate a quick bite. 

Next we headed through the show room to browse. Debbie was able to see the Expedit bookshelves in person for a craft room project she's been planning out and Ron found a desk chair he had to have. Ben + I had a fairly long list, but we weren't planning on getting all of it. His parents ended up getting the tunnels for the boys to replace a teepee they had gifted them for Christmas that sadly kept falling apart. 

We were able to compare the bunk bed we thought we were going buy with others and ended up getting something completely different! It was nice to have Ron + Debbie there to bounce off ideas. Debbie pointed out that they'd outgrow the small one, which oddly enough I hadn't been thinking about. I was just focused on what would work for us NOW. If we had unlimited resources we'd get the small one now, then a bigger one later...but we don't. So we talked it over, looked at the small one, went back to the bigger one and decided to buy it. 

I tested out IKEA's registry app on my phone, it was fun to scan items and have them quickly appear on a registry. It was easy to use but it made an annoying ding sound every time, and it drained my phone battery pretty quickly. 

We made it through the showroom and the Children's section in about an hour, then headed down to the marketplace. Ben + I had skipped this entire portion of IKEA when we went for the first time. We thought that downstairs was all warehouse. I discovered the marketplace when I went with my girlfriends last November and was pretty excited to shop there with Ben. So many great things at low prices!

At one point Ben + I had a misunderstanding when I was asking him to grab something from one aisle to bring it to the next one so I could compare size. I turned to Debbie and asked her to excuse us for a moment (alluding to the joke we made earlier), and she thought I was serious! It was pretty funny. Not only were there no quarrels but we had a fantastic time. Ben + I surely did not take for granted the ability to shop kid-free!

We browsed here and there, made a few tiny impulse purchases and then got down to what was left on our list. We made it through in less than an hour and headed to the warehouse. When we found the bunk bed we weren't sure it would fit in Ron's Tahoe, but he thought if we folded down one side of the bench seats in the back we'd be ok.

{forever a kid at heart}


We grabbed it, Ron's chair and browed As-Is with no success. I was surprised that things were discounted very low, I'd rather pay a little more for a new and undamaged item in the rest of the store. Anyway, we checked out the food section, grabbed my mom some chocolate almond cake and then made our purchases. Aside from the beds, Ben + I spent just under $30! 

I'm not expert, this was only my 3rd time ever at IKEA but by the end of 3 hours, Ben + I had mastered a few short cuts to run back to find things rather quickly. We maneuvered through the streams of people (literally half of them pregnant women- not exaggeration) and got back to where we had left off in just minutes. 


Once we got to loading, things got pretty interesting. It took several tries to fit the bed frames in to the back of the Tahoe. They had to fold down the bigger side of the back so only one of us (me) could sit back there, so the other 3 had to squish up front...but they did it! 

When it was done, Ron slammed the back hatch closed...onto a can of Pepsi that exploded all over me. None of it got on him, or Ben- who was standing right next to me. I was covered head to toe. I screamed because the loud sound and gush in my face was rather startling and then I cracked up when I realized what had happened. I had an audience of about 20 or so shoppers coming out with their purchases. Talk about embarrassing. I managed to clean myself up back in the restrooms and not feel too sticky for the 2 hour ride home.

We stopped to drop off our 3 giant boxes for the bunk bed and our bag of stuff before going to pick up the boys. Ben + my brother put the bed together the following afternoon. Nothing like 3 ginormous boxes crowding your living space as motivation!


As you can see from the photos, the boys love the bunk bed. I had a few mini heart attacks at first when Des mastered climbing on his own. He fell from the bottom of the ladder once when he snuck in there and hasn't tried climbing it by himself since.

Malakai loved sleeping up there at first, but I think he misses our nightly 2 minute snuggles because he's been hesitant about it. Still, he falls asleep fast and stays asleep all night so far. Desmond has actually been sleeping better in his part of the bed than he was before. It's afforded us a lot of extra space in their room, which we still haven't done anything with. We're still deciding which pieces of furniture to keep/move/store in the playroom as we transition it to nursery.

We got a handful of small things as well. Mostly storage solutions...


We stocked up on kids' cutlery, which the boys use daily. The other brightly colored items are ice cube trays. I can see them being molds for other fun + crafty things as well. The roll of paper was meant for the boys' easel, I didn't measure first and it's just slightly too long. Sad day. Not pictured above are the awesome tunnels from Children's Ikea and alphabet crackers from the food section that Ron + Debbie bought the boys

We also got a "BYGEL" set, which is the vertical metal bar, the basket, hooks, and black cup. It will go up underneath the kitchen cabinets for extra storage. The black item at the bottom is a folded up under bed storage box from the SKUBB line, which is my favorite of their storage boxes, they are sturdy but cheaper than many of their other options and come in a lot of sizes + types. And of course, we bought another giant .50 IKEA bag, which has about 101 uses.

So, there you have it. What we didn't buy from my wish list I added to the registry app or have on my own personal wish list for gift ideas. I don't know that we'll officially use the IKEA registry when it comes to our baby shower, since it's so far away. However, we do have plenty of friends in Portland that might be able to use it, so you never know.

What's your favorite IKEA find? Do you have one nearby or do you have to plan a road trip to get there?

Monday, July 1, 2013

EASY No-Bake Granola Rounds

In an effort to make a quick and easy breakfast or snack, I went looking for a granola bar recipe. I found quite a few that I took from and sort of worked out with what I  wanted to use in mine. No-bake was a must as the temperatures have been rising and I don't want my a/c unit to have to work any harder than it already is. Plus, it's pretty difficult to use the oven in my teeny kitchen with two kids running around.


Here is the recipe for my No-Bake Granola Rounds

2 cups rolled oats
1 cup unsweetened shredded coconut
2/3 cup peanut butter
2/3 cup honey (or sticky sweetener of your choice)
1/4 cup or less chocolate chips

Stir the oats and coconut together in a large bowl. Then add the peanut butter and honey and stir until the oat/coconut mixture is evenly coated. Next time, I may use less honey as these turned out pretty rich. Although they pair with coffee perfectly. 

Most granola "bar" recipes call for adding the mixture to a square pan, so if you prefer this method use an 8x8 and then cut into bars when ready. I put mine in a muffin tin to make rounds instead of bars. That way I could just pop them out, no cutting. I pressed the mixture into each round and then pressed in chocolate chips on top. 


Let cool in the fridge at least 30 minutes to set, then cut or pop out and enjoy! I also stored them in the fridge to keep them firm. I'm not sure how well these would travel long term as the honey and peanut butter may get kind of melty when warm, but my husband loves eating them in the car on the way to work!

As always, let me know if you try these out. Enjoy!

Thursday, June 20, 2013

"Enchiquitos"


One of my favorite recipes to make and eat is one I like to call "Enchiquitos". I adapted the recipe from one I found online nearly a year ago. I wrote down my changes, but didn't hang on to the original recipe, so I'm unable to give credit. These could be compared to the newly popular "baked taquitos" that are floating around the internet, but I surely prefer the name Enchiquitos. It's more fun to say and they are more of a combination of enchiladas and taquitos in my opinion.


Ben loves it when I make these...and honestly so do I. They are perfectly crispy on the outside but creamy and flavorful on the inside. I always try to make enough for him to have the leftovers for lunch the next day, he's told me that he's envied by co-workers on those days...which makes me very happy.

So, on with the details shall we?

Enchiquitos
Ingredients
1/3 Cup (3 oz.) Cream Cheese
1/4 Cup salsa
1 Tbs. lime juice
1/2 tsp. cumin
1/4 tsp. garlic powder
1/4 C chopped onion OR 2 Tbs. sliced green onion
2 Cups shredded cooked chicken (I cook up a frozen chicken breast in the oven a few hours prior)
1 Cup grated cheddar cheese
4-6 large flour tortillas
olive oil cooking spray
coarse salt

Preheat oven to 425 degrees. Prepare your bakeware by spraying generously with the olive oil cooking spray. Keep it handy, you'll need the spray again later. I use a 9x13 dish most often, but these can be baked on a cookie sheet.

First, heat the cream cheese in a microwave safe dish for 20-30 seconds to soften. If you have a pretty powerful microwave, try in 10 second increments. Mine's on the older side so I can go longer before making a splattery mess of things.

In a medium bowl combine the softened cream cheese with the salsa, lime juice (I use fresh squeezed), cumin, and garlic powder. Mix well. Next add the onion, chicken, and grated cheese. Combine well.

I prefer these with green onions, I really like green onions. I almost always have them around in a dish in my freezer. If you prefer white, yellow, or even red onions- take your pick or combine if you REALLY like onions.

Next, place about 3 Tablespoons of the mixture in the middle of a large tortilla. If you are using a baking dish you can make fewer enchiquitos and stuff them fuller, but I wouldn't recommend that if you are baking on a cookie sheet as the mixture will ooze out the ends while baking.


Spread the mixture out a bit and roll the tortilla tightly around it. Place it seam side down on your well oiled bakeware. Repeat until the dish is full, or you're out of mix. If you bake in a 9x13 dish and they are touching, the sides will be soft but the top and ends will be crisp. If you lay them out on a large cookie sheet with spaces between each one, they will be crispy all over- more like a taquito. I prefer to make them in a dish- enchilada style.


Spray the tops with your olive oil spray and sprinkle with the course salt. Bake (uncovered) in your preheated oven at 425 degrees for 15-20 minutes, or until the tops are crisp and the ends begin to brown. Note that they will be done quicker if you chose to use a cookie sheet instead of a baking dish.

Be very careful before eating as they will be VERY hot inside. I've been too eager on more than one occasion and suffered a burned mouth...it was worth it.

Serve with a side of sour cream and enjoy.


What's your favorite hybrid recipe? What's your go-to meal? I used to make a cheesy-chicken and rice casserole whenever a friend or family member had a new baby or was ill. Now I make Enchiquitos!

And, if you're in need of a way to reorganize your best recipes, check out Blurb Books cookbook options! We used Blurb to make our wedding album and I absolutely loved their book editor. It turned out beautifully, I would love to make a cookbook some day!


Wednesday, November 7, 2012

Crockpot Teriyaki Chicken

Years ago a good friend of mine (Jamie, who I've referenced several times here, and many of you know) made us a teriyaki chicken and rice dinner that was to DIE for. When she offered to make a meal after Malakai was born Ben requested it specifically- same for when we had Desmond.

I don't have her recipe, and I don't think I could make it quite like hers anyhow, but I went searching for my own slowcooker recipe. I found this one on Pinterest and usually just change it to use what I have on hand. For example, I NEVER have red wine vinegar or ground ginger so I just leave those out and it still turns out delicious.


Here is my adaptation of this recipe, which is currently in my crockpot for tonight's dinner.

Ingredients-
2-3 boneless skinless chicken breasts (I toss them in straight from the freezer)
1/2 cup soy sauce
1/2 cup sugar
1 tsp. minced garlic
2 Tbs. oil (take it or leave it)

(Note: Jamie makes hers less spicy for us, but I'm pretty sure she usually includes sriracha sauce)

Directions-
Place the chicken in the slow cooker. Mix the rest of the ingredients in a small bowl, pour it over the chicken. Cook on low for 8 or high for 4 hours. I usually do the latter because often I forget that I want to do a crock pot dinner until around lunch time. Mornings are a bit nutty around here, I often don't get my coffee until we've been up for 3-4 hours.

Something random: I always run my crock pot in the garage. Once our entire house (all 900 square feet) smelled of this recipe for days and I couldn't stand it. So I prepare it in the kitchen and then set it on top of my washing machine to smell up the garage. It's much more pleasant than pulling on a garlicky shirt out of the closet the next day.

Anyway, once it's done and I bring it in I throw together some rice. While the rice is cooking I take two forks to shred the chicken, sometimes right in the crockpot, sometimes I take it out and then add it back to the sauce. I stir it and let it soak up some sauce. Once the rice is done just spoon the chicken and sauce over a bed of rice.

This usually makes enough for Ben + I, plus a small portion for Kai (Des will try it for the first time tonight), and there is plenty left over for Ben's lunch the following day. It is still very yummy as a leftover. It's also incredible with a side of roasted or stir fried green beans, which is how Jamie served it to us that first time.

Enjoy!

Tuesday, February 14, 2012

apple salsa + a culinary tip

When Ben had to avoid just about every food on the planet, one of those was tomatoes. Normally that wouldn't be a big deal because he doesn't like them, however, the man loves salsa. Coincidentally, I came across a recipe via facebook post from Our Best Bites (who I won my Cuisinart Ice Cream maker from). Their recipe actually focuses on the main dish, but I was really only interested in the apple salsa.

Before I had never heard of apple salsa, just mango or pineapple, which are both too sweet for us. I've made this apple salsa several times now and have been working on perfecting it to what we want. I also referenced Rachael Ray's version for quantities since the other was more of a garnish. I made one batch where I used the food processor to chop all the ingredients, another time I  tried adding some fuji apples for a little more sweetness. After all the experiments I think I've finally come up with the best version.

Granny Smith Apple Salsa

4 Granny Smith Apples
1/2 small red onion
1/4 cup cilantro
1 small lime
1/4 teaspoon salt

Wash, peel, and coarsely chop the apples. I found that cutting with a santoku knife and then chopping with a mezzaluna worked well for this. Add to medium bowl.

Finely chop the onion or run it through your food processor real quick. Same can be done with the cilantro, but I just chopped it up with the mezzaluna as well. (When you have little ones you can't always rely on loud appliances). Add onion and cilantro to your bowl of chopped apples.

null
{these had me weeping uncontrollably}

Cut your lime and squeeze the juice into the mix. Salt to taste... I only measure salt when baking. Then stir it all up and enjoy with your favorite tortilla chips or over a spicy dish to give it a little salty sweet kick. Easy and so yummy!

null

Now here's my little "culinary tip". I actually read this in a magazine but I don't recall which one. Perhaps this is well-known and I'm just discovering it, but you can freeze fresh herbs! Exciting stuff, I know.

Cilantro comes in bundles of much more than I could ever use before it wilts. So this time around I washed it, plucked off all the little leaves from the whole bunch, and coarsely chopped it all. Then I chopped what I was going to use in the salsa a bit finer.

I added a little water to an ice cub tray, put the leftover cilantro in and added a bit more water. The water is really just to make it so you can actually remove the cubes. Then when you're ready to use it, just thaw and drain a few cubes! 

null

I'm always throwing out fresh herbs when they are no longer "fresh" so it'll be nice to have this trick up my sleeve to save the extras!

Friday, January 13, 2012

dairy-free peanut butter ice cream

It's been a while since I've posted recipes around here. Lately I've been trying new ones left and right. About a week ago Ben started a temporary diet, by his doctor's orders. For a month he's to have no dairy, eggs, wheat, tomatoes, or chocolate. I've been doing a lot of research and we've learned that wheat, milk, and eggs are in just about everything! Soy sauce- wheat. Ranch dressing- milk and eggs. Taco seasoning- wheat again! When I went shopping Ben called it a treasure hunt, and he  was right! I spent a lot of time reading labels and searching for ingredients and meal options to make sure he wouldn't miss the things he couldn't have too much.

Something that he's missed is an occasional bowl of ice cream with me in front of the tv when the kids bless us by sleeping at the same time early enough for us to have the energy to stay up and hang out before we go to bed too. First, I tried a "one ingredient" ice cream recipe that I found through Pinterest. It's made by pureeing frozen banana, and adding any flavor you want. Apparently a frozen banana is supposed to blend up into a nice soft serve. However, I have a really old food processor and it was much more work than it was worth to finally obtain the desired consistency.

I kept looking all over the web for a good recipe free of dairy and chocolate. I didn't find much that would be appealing to him so I decided to try on my own. We had some vanilla soy milk that he found too sweet to drink on it's own, so I started there and loosely followed a couple recipes that came with my Cuisinart Ice Cream maker (that I won a while back). So here it is...

Dairy-Free Peanut Butter Ice Cream

3 cups soy/almond/rice milk (I used a little of each)
1/2 cup non-dairy creamer
3/4 cup granulated sugar
2 Tablespoons vanilla extract
1 1/8 cups creamy peanut butter ("high quality", but not natural)

Blend peanut butter and sugar on low until creamy (Cuisinart's instructions called for a hand mixer I used my Kitchen Aid mixer).

Add milk + "cream" and mix on low until sugar is dissolved, 1-2 minutes. Add vanilla. I had to scrape the bottom of the bowl to mix in the peanut butter that stuck. Then add the mixture to ice cream maker for 25-30 minutes or per the instructions for your particular ice cream maker.

null

I fully expected the ice cream to be too icy because of how little "cream" I had to put in it. Once when I tried frozen yogurt it turned out too thin because I had used low fat yogurt. It was impossible to scoop once fully frozen. However, I think the peanut butter helped thicken this recipe up. I took a small taste and it is awesome! I'd eat this creamy dessert even if we didn't have limitations to worry about. If I were to make a different flavor I would adjust the milk to creamer ratio to use more creamer.

Let me know if you try it or if you have any recipes to share! My biggest challenge has been finding bread, so any help there would be appreciated as well. I plan on heading to Market of Choice this weekend to see what kind of options there are.

Friday, August 5, 2011

growing my first garden

Most of my growing up was on a large ranch just outside the city limits from where I live now. We almost always had a garden. We at least had pumpkins if only from tossing the previous ones out into a patch of dirt somewhere.

The last 4 years we've lived in homes with plenty of yard space for gardening, but I didn't take the time to try my hand at growing something on my own. Most of my hesitation came from having little to no success at keeping house plants or easy plants alive. I'd often forget about watering them or keep them in the wrong type of environment.

A good friend of mine has a very impressive vegetable garden and I finally decided to take a try at growing my own. We already had the raised beds, one full of strawberries that I decided to pay closer attention to this season. Of course the weather here didn't cooperate very well for strawberries and then I ran into a few pests: strawberry snails + sugar ants. I used google and surveyed my facebook friends who advised eggshells, coffee grounds, and human hair! Coincidentally I had just cut Kai's hair so I used all three and was able to save a lot of the strawberries. They turned out okay, but I've learned that ever-bearing strawberries should be moved to new spots and who knows how long those berries have been in the raised bed since they were here before we were.

On Memorial Day weekend I decided to plan veggies in our two other raised beds. A couple weeks before Ben was sweet enough to clear the beds of weeds and debris, then we worked together to add more nutrient rich soil. I planted Jack-o-lantern pumpkins, sweet dumpling squash, "slicer" tomatoes from starts, carrots, and sugar snap pole peas. I built a lattice out of bamboo arches and gardeners twine for the peas to climb. It only cost me $5 which was much cheaper than buying lattice or something premade for them to climb.

About 10 days after planting, the first sprouts started to come through. I was so excited that my garden was actually starting to grow!

6.8.11 garden

Malakai and I would go out every morning and check on the veggies. He loves helping...

6.8.11 garden helper

I was surprised by how fast things were growing, especially the pumpkin leaves, which were visibly bigger every day!

Photobucket
{I made markers out of a cut up milk jug}

Another week went by and everything continued to grow as I kept the weeds and pests at bay. I didn't use any chemicals, just suggestions I found through google and  knowledgable friends.

Photobucket

I did my best to keep up with the watering, but as our summer schedules got busier it got more difficult. Thankfully we've had pretty cool weather so nothing scorched. Ben then set up some sprinklers on a timer thanks to some timers that his dad let us have. Now we're able to water the garden automatically at 5:30am every day. On particularly hot days I turn on the sprinklers for a bit in the afternoon or evening too.

About 6 weeks after planting our garden had filled the raised beds!

Photobucket
{towering tomatoes + climbing sugar snaps in the background. spreading pumpkin + squash up front}

A little over a week ago it became evident that my garden was trying to take over the world...

Photobucket
{those tomatoes have cages in there somewhere + the pumpkin is creeping into the yard}

I had my friend Jamie come over to look at my garden and give me some advice. She was so sweet to help me out. She advised me on how to contain my tomatoes and how to tell when things were ready to pick. 

Photobucket
{peas + maters}

The next day I went to work on tying up my tomatoes with the gardener's twine I had from the structure I made for the sugar snaps to climb. I weaved some of the smaller branches back in to the cages and tied the heavier ones to the cages. Then I tied them up around both plants a couple times for added support. I also trimmed some of the limbs that would have just snapped from the weight of the fruit anyway. I also harvested 50+ sugar snaps. It took me about 45 minutes which ended up being a rather large and lengthy pain in the back. Gardening while pregnant isn't easy!

Photobucket

Earlier this week I picked another 50 or so peas and spotted a pumpkin forming! I'll be picking all the carrots this weekend + planting more in their place.

Photobucket


I shared the sugar snaps with our extended family and will probably have enough to pick new ones at least once, if not twice more. Now I'm just waiting on the tomatoes to get big and red while I pray that bugs + birds don't get to them first! Any tips are greatly appreciated.

Photobucket

I wish I could say that growing our own food has inspired Malakai to eat more veggies...but it's just not true for us yet. He at least tastes them before spitting them out, we'll keep trying!

What's growing in your garden?

Happy Weekend everyone!

Tuesday, December 28, 2010

Christmas Breakfast: "Camper" Cinnamon Rolls

This recipe is an  obsession of Ben's side of the family. From what I can remember, it originated with Ben's grandma while camping out at the lake. Now, camping in my family consisted of tents and a very small arsenal of supplies, especially for cooking. Ben's family mostly camped in cabins and trailers out at Triangle Lake. For those of you who cook over a camp fire, despite it's name, this recipe requires an oven.

Camper Cinnamon Rolls are addicting and making them is fairly quick and super easy.

Ingredients:

1/2 cup of sugar
1 tsp. Cinnamon
1/2 cup (1 stick) butter
1 package (12) brown + serve rolls

Set your oven to preheat to 450 degrees.

Cut each roll in half twice (quarters).

Mix the cinnamon + sugar together.

Melt the butter and drizzle over quartered rolls. More butter makes for gooier bites, less makes for crispier bites.


Sprinkle the rolls with the sugar + cinnamon mixture  and stir to coat evenly.


Bake on a jelly roll pan (a cookie sheet with sides) for 2 1/2 minutes, turn with spatula, then bake for another 2 1/2 minutes.


Be careful as they will obviously be very hot. Eat fresh!


On Christmas Eve we ate them right off of the cookie sheet! Then I made them on Christmas morning for my side of the family for the first time. I think they liked them, as we went through 2 1/2 batches and we also had our traditional lefse!

Enjoy!

Friday, December 17, 2010

a first: turkey applesauce meatloaf

A couple of weeks ago, in an effort to find protein rich finger foods for Malakai I decided to attempt meatloaf. He had eaten meatloaf at his Grandma's before, so I though I'd attempt something of my own.

I adapted this recipe from one I found at Wholesome Baby Food, a GREAT resource for homemade baby + toddler foods. I always go back there when I need new ideas.

I adapted the recipe to use ingredients I had in my house.


Here's what I used:

1 lb. ground turkey
1 cup breadcrumbs
1/4 cup unsweetened applesauce
1 tsp. minced garlic
1/4 cup wheat germ
dash of dried basil
1 egg

I didn't actually have any breadcrumbs, so I toasted some bread + crumbled it up. Then I mixed everything together in a bowl and added it to a greased (olive oil spray) loaf pan.


Then I put it in the oven at 350 degrees for 45 minutes.

I must confess that my first try was a bit interesting. I don't have a meat thermometer, so I cut into the meatloaf to make sure there was no pink before pulling it out of the oven. I also used more applesauce + forgot the wheat germ so it was a bit too juicy.


If you or your little one prefer more spice try adding salt + pepper or whatever your favorite spices are as this recipe is very mild, bordering on bland for the adult palette. Malakai enjoyed it, with some ketchup at first, but then he ate it alone. He needs ketchup every once in a while to coax him to try something new or just to eat in general.

How do you get your toddler to eat new foods?

Wednesday, November 24, 2010

another dessert recipe

I think it's a little funny that almost all of my posts about cooking have to do with desserts. I don't usually make anything worth sharing for dinner. Except this soup I just discovered, but I didn't actually "make" it. Anyway, it's awesome- go buy it. But first, keep reading about these cookies I made...

On Friday night Malakai was still recovering from an upset stomach that we are now thinking came from him trying curry (not hot) for the first time. Poor kiddo. He went to bed early, so Ben + I were trying to figure out what to watch on Netflix.

Meanwhile, I had a mad craving for chocolate but only had some milk chocolate chips I had just grabbed at the grocery store. So, of course I busted into those. While I was eating them I discovered a recipe on the bag. One that was quick + easy and I had all the ingredients for. I decided to do some last minute night time baking to satisfy my sweet tooth. Ben even helped me make them, which I believe was the first time he's ever baked with me.

They're called shortbread rounds and they are teensie bite-sized little goodies. We learned quickly that they are very addicting.

Here's the recipe:

  • 1 cup butter, softened. 
  • 1/4 cup sugar
  • 2 cups unsifted flour
  • 1 cup milk chocolate chips (we used the Guittard ones, they're nice + fat)
Only 4 ingredients, I count that as awesome! Especially when working in my mini-sized kitchen. 

Since my decision to bake them was last minute, the butter was straight out of the fridge. So I put it on the oven racks while it was preheating, like I did with the cream cheese for my pumpkin rolls. Unfortunately this time, I got side tracked and they melted quite a bit and made a terrible mess in my oven (that might still be there). Ben said it smelled like pancakes. It could have been worse. 

I put all 4 sticks of butter in my mixer and the realized that 4 sticks is 2 cups  and I was certainly not trying to double the recipe. So I threw the extras in a tupperware container for later, but not too much later. Perhaps baking at the end of the day is not a good task for my tired brain to take on. 

Anyway, you beat the sugar with the butter with an electric mixer. Then you slowly add in the flour until blended. The dough should be a bit crumbly. Next add in the chocolate chips and mix by hand. 

{ridiculously wonderful dough to chocolate chip ratio}

Then, using the palm of your hands roll well rounded teaspoonfuls of the dough in to 1 inch balls. ( I flattened the first batch because I didn't know what the heck I was doing). Place on an ungreased cookie sheet and bake for 13-15 minutes at 350 degrees. I always set my timer to the lowest time when I'm baking so if I can't get to them right away I have time time before anything gets burnt. 


I made these cookies again today (I put that extra butter to good use quickly!) and I wanted to try other types of chocolate chips. I happened to have dark chocolate, mint, and white chocolate in addition to the milk chocolate. So instead of mixing up a cup into the dough, I scooped the dough into the palm of my hand, smooshed the chips into it and then rolled them up in the middle to make a variety of flavor combinations. 


Let the cookies stand for 2 minutes before removing from the sheet. You can opt to dust them with powdered sugar. We did some with + some without and preferred without. 


{then try your hardest not to consume them like popcorn}

Super quick, very easy, and totally yummy little treat. 

Enjoy!


Tuesday, November 2, 2010

Mom P's Lasagna

I actually made this lasagna 2 weeks ago and am just now getting around to posting about it. I had plenty of other baked goods to share with you so this one got put off until now. Yes, I'm posting about dinner at 8am. Gives you time to make it to night if you want!

This is my mother-in-law's recipe for lasagna. It's simple + yummy. She gave it to me with a handful of other recipes with my Christmas gift. I didn't realize until making it this time around that I am now also "Mom P." and I had to smile to myself while I was cooking with my little one under foot...

{really underfoot}


So the ingredients first because I always skim through the list of stuff I need when looking at a new recipe. Then either keep reading because I happen to have all those ingredients in my house at that moment, or save for another day when I've had a chance to go to the store. We don't keep a lot of exotic ingredients in my house, so I have to be really inspired to make something to go out to the store and get something for one specific recipe. 

3/4 cup chopped onion (in keeping with the above I used what I had left which was about 1/4 cup)
2 cloves minced garlic 
2 Tablespoons oil (I used olive oil)
1 lb. ground beef (I used turkey)
3 cans, 8 oz. each, tomato sauce (or whatever combo gets you to about 24 oz.)
2 teaspoons oregano
1 teaspoon salt
1/4 teaspoon pepper
8 oz.  cottage cheese (which is 1/2 a container, I used more )
1 egg
8 oz. mozzarella cheese
3 oz. parmesan cheese ( I think I used 6 oz. we really like cheese!)
9 pieces lasagna noodles


Whew! That's a lot of stuff. I used pre-minced garlic so a teaspoon equals about one clove. I had to pick up the turkey, tomato sauce, cottage cheese + mozzarella while stocking up on regular items at the grocery store in order to make this. 

First, cook onion + garlic in the oil until tender. 


Then add ground beef/turkey and cook until brown. Combine tomato sauce, oregano, salt + pepper. 


Simmer 30 minutes or until sauce is thick. 

I let mine simmer while I worked on boiling the noodles, grating the mozzarella + making the cottage cheese mix....


I don't buy pre-grated cheese. So to prepare the 8 oz. I needed I just cut a 1lb (16 oz.) block in half and grated it with a box grater. I've tried the mandolin slicer in the past...not great with cheese. 

Next, try not to trip over your child, if you have a toddler who is awake, I'm sure they are still underfoot.


For the cottage cheese mix, add 8-12 oz. cottage cheese and 1 egg into small bowl and mix well. Cook the lasagna noodles according to the directions on box or 12-15 minutes. Drain water + rinse in cool water. I set my noodles on tin foil while I was working on other things so they wouldn't stick to each other since they were done before I was ready to layer everything. 


Arrange 3 noodles in greased 9x13 pan. Cover with 1/3 of meat sauce, 1/3 of cottage cheese mix, parmesan cheese + sprinkle a little mozzarella. Do this twice more for 3 layers. The rest of the mozzarella goes on top. 


Bake in preheated oven for 30 minutes at 350 degrees. Let stand 10 minutes before cutting. Can also be prepared ahead of baking + refrigerated. 

I also baked some pre-made biscuits and steamed some green beans for this meal. Malakai loves lasagna. It's one of few meals that works for all 3 of us so far. 


{enjoy!}

As always, if you try any of the recipes I post, let me know! I'd love to hear how it turned out for you and any changes you may have made. 


Related Posts Plugin for WordPress, Blogger...

certified site

certified site